Freeze Green Beans: Blanched vs. Raw for Best Results
Preserving the vibrant taste of summer's bounty is a joy for any home cook, and few vegetables capture that essence as beautifully as fresh green beans. Whether your garden is overflowing, or you've found a stellar deal at the farmer's market, learning
how to freeze green beans allows you to enjoy their crisp texture and fresh flavor year-round. However, a common question often sparks debate in the culinary world: should you blanch your green beans before freezing, or can you simply freeze them raw? The truth is, there's no single "right" answer. Both methods offer distinct advantages and drawbacks, and understanding these can help you choose the best approach for your kitchen, your time, and your desired outcome. This comprehensive guide will explore the nuances of freezing green beans, helping you master both techniques for optimal freshness, flavor, and convenience.
The Great Debate: Blanching vs. Freezing Raw Green Beans
The decision to blanch or not to blanch green beans before freezing often comes down to a trade-off between convenience and long-term quality. Food preservation experts generally advocate for blanching, especially for vegetables destined for long-term freezer storage. This quick heat treatment serves several critical purposes that significantly impact the quality of your frozen produce. However, for those seeking a quicker method or planning to use their frozen beans within a shorter timeframe, freezing them raw is a perfectly viable and safe option.
Why Blanching is Recommended (and How to Do It)
Blanching is a brief cooking process, typically involving boiling water or steam, followed by an immediate plunge into ice water. This rapid temperature change halts enzyme activity within the vegetables, which is the primary cause of flavor, color, and texture degradation during freezing. Without blanching, these enzymes continue to break down the beans, leading to changes in color, a duller flavor, and a tougher or mushier texture over time, often resulting in what's known as "freezer burn" more quickly.
Benefits of Blanching:
*
Preserves Color: Keeps green beans their vibrant green.
*
Retains Flavor and Nutrients: Minimizes loss over long storage periods.
*
Maintains Texture: Helps beans stay crisp-tender, not mushy, when cooked from frozen.
*
Extends Shelf Life: Blanched green beans can maintain optimal quality for up to 12 months in the freezer.
*
Cleans and Brightens: Washes away surface dirt and brightens the vegetable's color.
How to Blanch Green Beans:
1.
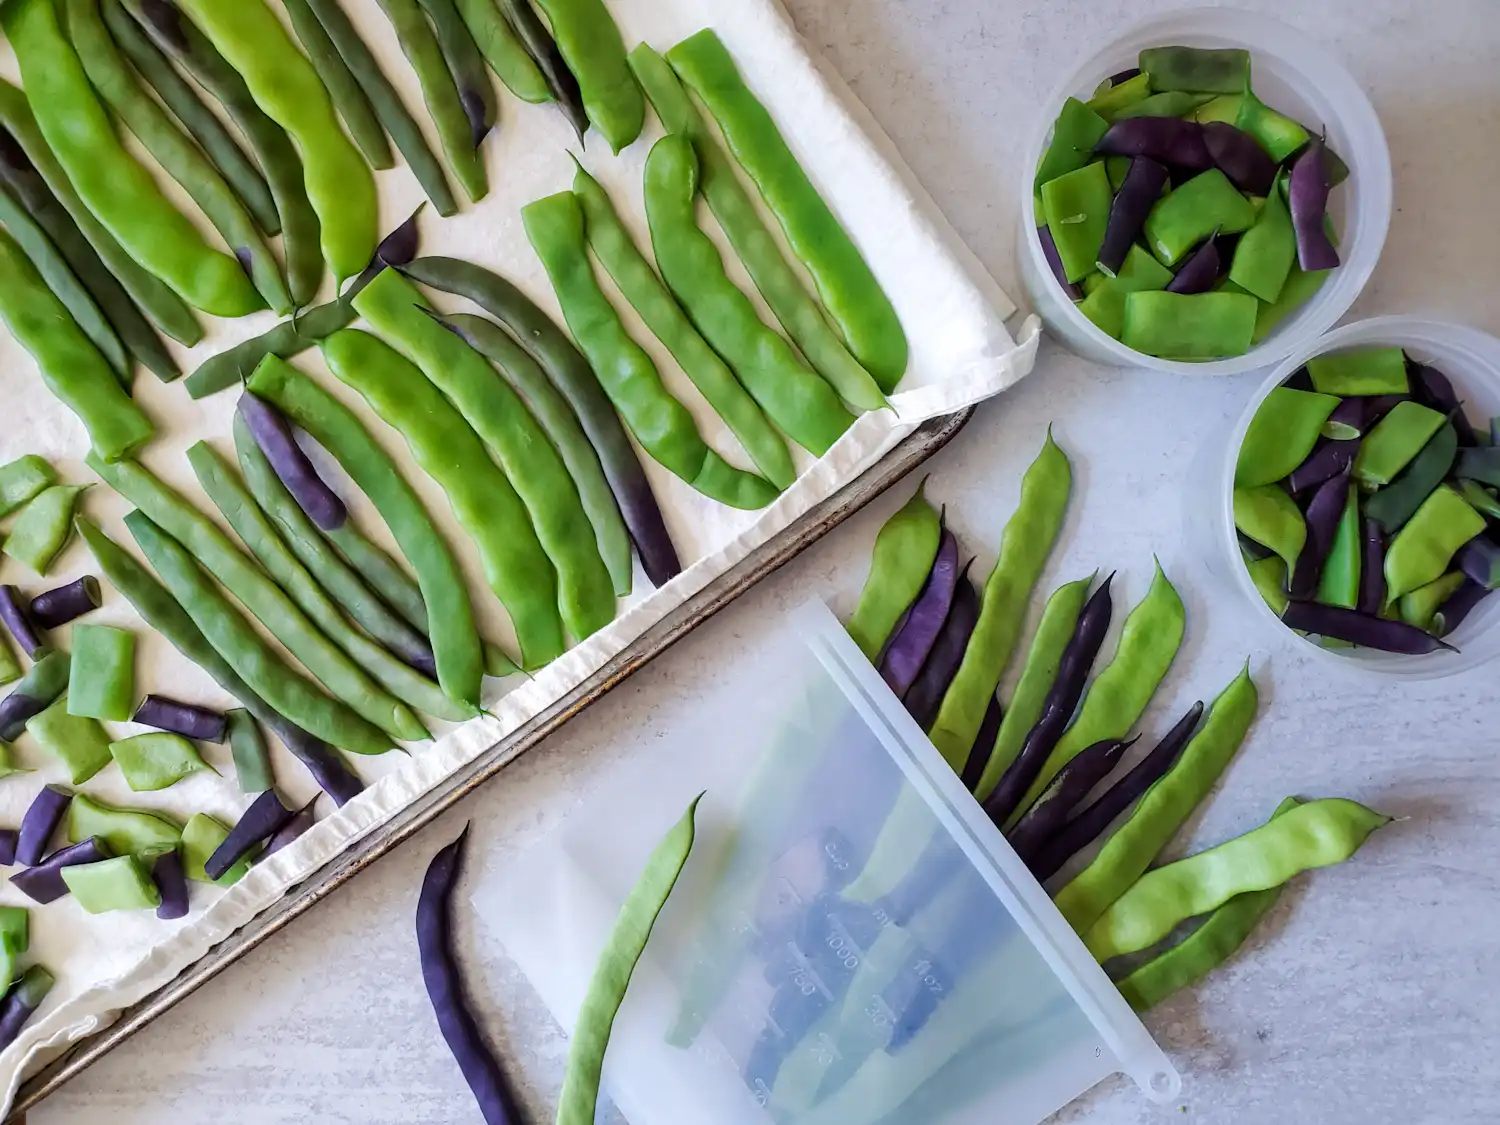
Prepare the Beans: Wash thoroughly under cold running water. Snap or trim off the ends, and either leave them whole or cut them into desired lengths (e.g., 1-2 inch pieces).
2.
Prepare for Blanching: Bring a large pot of water to a rolling boil. For every pound of green beans, you'll need at least one gallon of water. Alternatively, you can use a steamer basket over boiling water for steam blanching, which some prefer for better nutrient retention and less waterlogging.
3.
Blanch: Place the prepared green beans into the boiling water or steamer basket. Blanch for 2-3 minutes for whole beans, 2 minutes for cut pieces. Avoid overcrowding the pot, as this can lower the water temperature and lead to uneven blanching.
4.
Prepare the Ice Bath: While the beans are blanching, prepare a large bowl of ice water. This step is crucial for stopping the cooking process immediately.
5.
Chill: Promptly remove the beans from the boiling water/steamer and plunge them into the ice bath. Let them cool completely, typically for the same amount of time they were blanched.
6.
Dry Thoroughly: Drain the beans well and spread them in a single layer on clean kitchen towels or paper towels to air dry. This step is critical to prevent ice crystals from forming and causing freezer burn. Ensure they are as dry as possible before freezing.
The Convenience of Freezing Raw Green Beans
For those who prioritize speed and simplicity, freezing green beans without blanching is a perfectly acceptable method, especially if you plan to use them relatively quickly. It’s certainly safe to do, and many home cooks attest to its practicality for small batches or specific recipe applications like soups and stews where texture might be less critical.
Benefits of Freezing Raw:
*
Time-Saving: Eliminates the blanching and chilling steps, making the process much faster.
*
Less Equipment: No need for large pots, ice baths, or extensive drying time.
*
Quick Preservation: Ideal for when you have a small amount of beans and want to get them into the freezer fast.
Drawbacks of Freezing Raw:
*
Shorter Shelf Life: Best used within 2-3 months for optimal quality. Can last up to 6 months, but quality may decline.
*
Potential for Degradation: Over longer periods, raw frozen beans are more susceptible to flavor loss, color changes (turning dull green or even yellowish), and a tougher or mushier texture once cooked.
*
Freezer Burn Risk: Higher likelihood of freezer burn if not packed extremely well.
How to Freeze Raw Green Beans:
1.
Prepare the Beans: Wash the green beans thoroughly and trim the ends. You can leave them whole or cut them.
2.
Dry Completely: This is the most crucial step for raw freezing. Spread the beans on clean towels and ensure they are absolutely dry. Any moisture will turn into ice crystals, accelerating freezer burn.
3.
Pack Tightly: Place the dried beans into freezer-safe bags or containers. The key here is to remove as much air as possible to minimize freezer burn. Vacuum sealing is highly recommended for raw beans to extend their quality.
4.
Label: Clearly label with the date and "RAW" to distinguish them from blanched beans and prioritize their use.
Prepping Your Green Beans for Freezing: The Foundation of Quality
Regardless of whether you choose to blanch or freeze raw, the quality of your fresh produce directly impacts the outcome of your frozen stash. Starting with the best beans ensures you'll enjoy superior flavor and texture months down the line.
Selecting the Best Beans:
*
Freshness is Key: Prioritize freshly harvested beans. If you’re not growing them yourself, seek out local farmer's markets for beans picked recently. Grocery store beans, while convenient, have often traveled extensively and may have begun to degrade.
*
Choose Tender, Crisp Varieties: All types of green beans – from classic string beans and pole beans to slender haricots verts and wide Romano-style beans – can be frozen. Select beans that are firm, snap easily, and are free from blemishes or soft spots. Avoid overgrown, tough, or noticeably stringy beans, as these qualities will only be amplified after freezing.
*
Act Quickly: Aim to freeze your green beans within a couple of days of harvesting or purchasing. If you can't freeze them immediately, store them in the crisper drawer of your refrigerator in a plastic bag to maintain their freshness.
Washing and Trimming:
* Wash the beans thoroughly under cold, running water to remove any dirt or debris.
* Snap or trim off both ends of each bean.
* Decide whether you want to freeze them whole or cut them into smaller, uniform pieces. Cutting can make them more convenient for recipes later.
Maximizing Storage and Enjoyment: Tips for Frozen Green Beans
Once your green beans are prepped and either blanched or dried, proper packing is essential for long-term quality and to prevent freezer burn.
Effective Packing Techniques
1.
Flash Freezing (Recommended for Both Methods): For individually frozen beans that won't clump together, spread your prepared (blanched and dried, or just raw and dried) green beans in a single layer on a baking sheet. Place the sheet in the freezer for 1-2 hours, or until the beans are solid.
2.
Airtight Packaging: Once flash-frozen, transfer the solid beans to freezer-safe bags or containers.
*
Freezer Bags: Squeeze out as much air as possible before sealing. A straw can be used to suck out residual air, or a vacuum sealer is ideal for removing almost all air, significantly extending storage life and preventing freezer burn.
*
Rigid Containers: If using containers, pack them full to minimize air pockets, leaving about half an inch of headspace if beans are loosely packed.
3.
Labeling: Always label your bags or containers with the date and whether the beans are blanched or raw. This is crucial for proper freezer rotation and ensuring you use the raw beans first.
How Long Do They Last?
*
Blanched Green Beans: Will maintain excellent quality for up to 10-12 months. Beyond this, they are still safe to eat but may gradually lose some texture and flavor.
*
Raw Green Beans: Best used within 2-3 months for optimal quality. They can be edible for up to 6 months, but expect more noticeable changes in texture and flavor, making them ideal for dishes where they'll be cooked down, like soups.
For a deeper dive into optimizing your freezing process and achieving long-term freshness, you might find valuable insights in
How to Freeze Green Beans: Garden Fresh for a Year, or consider the nuances of each method in
Blanch or Not? Your Guide to Freezing Green Beans.
Cooking from Frozen
One of the great advantages of frozen green beans is their convenience. In most cases, there's no need to thaw them before cooking.
*
Steaming or Boiling: Add frozen beans directly to boiling water or a steamer. Cook until tender-crisp.
*
Sautéing: Add frozen beans to your pan with a little oil. They might release some moisture initially, so increase heat to evaporate it.
*
Soups and Stews: Simply toss frozen green beans directly into your simmering soups, stews, or casseroles during the last 10-15 minutes of cooking.
Beyond Freezing: Creative Uses for Your Stash
Once you have a freezer full of beautifully preserved green beans, the culinary possibilities are endless! They are incredibly versatile and can be incorporated into countless dishes, bringing a touch of garden freshness to any meal.
*
Hearty Soups and Stews: A classic use, frozen green beans are perfect for adding bulk and nutrition to winter warmers.
*
Comforting Casseroles: Think green bean casserole, but with fresher-tasting beans.
*
Quick Stir-Fries: Toss them into your favorite Asian-inspired stir-fry for a healthy and satisfying meal.
*
Simple Side Dishes: Steam, sauté with garlic and butter, or roast them for an easy accompaniment to any main course.
*
Pasta Dishes: Add to pasta salads or hot pasta dishes for a burst of green.
*
Roasts: Roast alongside chicken, fish, or other vegetables for a flavorful medley.
Ultimately, the method you choose for
how to freeze green beans boils down to your personal priorities. If pristine quality, vibrant color, and an extended shelf life are paramount, then blanching is your best bet. If time is of the essence and you plan to use your beans within a few months, especially in cooked-down dishes, freezing them raw is a fantastic, time-saving alternative. Whichever path you take, the effort of preserving fresh green beans ensures a taste of summer’s bounty can be savored long after the harvest season has passed, enriching your meals with wholesome, garden-fresh goodness throughout the year.